Now You Know Digitizing of a Pattern by Using Gerber Scientific’s Digitizer and AccuMark Software
Monday, 4 February 2019
Edit
Digitizing of a Pattern by Using Gerber Scientific’s Digitizer and AccuMark Software
Bilal Rashid
Dept. of Garment Manufacturing
National Textile University, Faisalabad, Pakistan
Email: br.dmc.gcuf@gmail.com
Bilal Rashid
Dept. of Garment Manufacturing
National Textile University, Faisalabad, Pakistan
Email: br.dmc.gcuf@gmail.com
ABSTRACT:
The title of the experiment was to “Digitizing of a Pattern by using Gerber Scientific’ s Digitizer and AccuMark Software”. The experiment included launching of the AccuMark Software and then selection of the specific Storage Area in hard-drive (previously created as 10-187), creation of Rule Table, leading to the use of Digitizing Table and Mouse with Cross-hairs to convert the Pattern in hard-form to a Pattern in soft-form or “Digitized Pattern” in the AccuMark Software. Thus reducing edit time and increasing efficiency.
 |
| AccuMark Software used in pattern making |
OBJECTIVES:
- To Digitize a Pattern by using Gerber Scientific’ s Digitizer and AccuMark Software.
BACKGROUND:
AccuMark is used to digitize the garment pattern, grading and marker making. Digitizing is a process of adding details of a pattern or slope into the computer. The pattern making is done by the notch type, grading rules, sizes to be produced. Other 2 hardware used with Gerber for this purpose are plotter and digitizer.
In this software storage area is used to define the work area on a computer, each individual can make his own storage area. A storage area is used to group related work, such as pattern pieces and a marker for a particular style. Different garment shapes should have different storage areas. Data such as information about notches can be moved from one storage area to another and can be used for many different patterns and markers.
It is important here to arrange the data to avoid the loss of data due to computer problem. Data can be moved from one storage area to another and can be saved on your computer hard drive or a removable storage medium. All data are managed using the AccuMark explorer. Components of data management include the following:
Renaming:
You can change the name of data file or folder according to your choice
Deleting:
Remove a data file or folder from a storage area.
Copying:
Copy the data from one storage area to another area. The original data remains in the original storage area.
Dragging:
To copy data from one area to another by “Clicking & Dragging”.
Saving:
Saving modified AccuMark tables in desired storage area on the C: drive, pattern pieces created in the pattern designed system are also saved in the storage area. This data can be saved on a hard drive or a removable storage medium.
Exporting:
Copy the data from the program files to the hard drive or to a removable storage medium. The files are saved on zip format.
Importing:
Copy the data in a zip file format from a removable storage medium or the hard drive to a storage area in AccuMark. If we are working in the apparel design industry then we mostly saved the data in the hard drive.
AccuMark is used to digitize the garment pattern, grading and marker making. Digitizing is a process of adding details of a pattern or slope into the computer. The pattern making is done by the notch type, grading rules, sizes to be produced. Other 2 hardware used with Gerber for this purpose are plotter and digitizer.
- The plotter draws full-size or scaled pattern pieces and marker information is sent to the plotter from a computer.
- The digitizer is used to digitize the entered information in the computer. The digitizer has two components; the digitizing table and the digitizing cursor.
- The digitizing table holds the piece and receives the digitizing signal from the digitizer cursor.
- The digitizing cursor is used to trace the pattern pieces.
In this software storage area is used to define the work area on a computer, each individual can make his own storage area. A storage area is used to group related work, such as pattern pieces and a marker for a particular style. Different garment shapes should have different storage areas. Data such as information about notches can be moved from one storage area to another and can be used for many different patterns and markers.
It is important here to arrange the data to avoid the loss of data due to computer problem. Data can be moved from one storage area to another and can be saved on your computer hard drive or a removable storage medium. All data are managed using the AccuMark explorer. Components of data management include the following:
Renaming:
You can change the name of data file or folder according to your choice
Deleting:
Remove a data file or folder from a storage area.
Copying:
Copy the data from one storage area to another area. The original data remains in the original storage area.
Dragging:
To copy data from one area to another by “Clicking & Dragging”.
Saving:
Saving modified AccuMark tables in desired storage area on the C: drive, pattern pieces created in the pattern designed system are also saved in the storage area. This data can be saved on a hard drive or a removable storage medium.
Exporting:
Copy the data from the program files to the hard drive or to a removable storage medium. The files are saved on zip format.
Importing:
Copy the data in a zip file format from a removable storage medium or the hard drive to a storage area in AccuMark. If we are working in the apparel design industry then we mostly saved the data in the hard drive.
GERBER SCIENTIFIC:
Gerber Scientific Inc., located in Tolland, Connecticut, is the parent of companies that supply sophisticated software and hardware systems for apparel and technical textiles, sign making and specialty graphics, composites and packaging applications. Headquartered in Tolland, Connecticut, USA, the company operates through four businesses: Gerber Technology, which serves 25,000 customers, including more than 100 Fortune 500 companies; Gerber Scientific Products, Virtek Vision International and Yunique Solutions.
Gerber Scientific is owned by Vector Capital, a San Francisco-based, global private equity firm specializing in the technology sector that manages more than $2 billion of equity capital. On August 18, 2011, Gerber Scientific’s stockholders approved the take-private transaction of Gerber Scientific, Inc. by Vector Capital in a transaction valued at approximately $283 million. CITIC Capital Partners, a leading China based private equity firm, has a minority stake in Gerber Scientific alongside Vector.
The business began as the Gerber Scientific Instrument Co., founded in 1948 by Austria native Joseph Gerber to support his invention of a variable scale, the first of 675 patents he'd eventually hold. In 1994, President Bill Clinton presented Joseph Gerber with the National Medals of Technology and Science at a ceremony at the White House in Washington DC, USA.
In 2004, Gerber Technology received the Export Achievement Award from the U.S. Department of Commerce. The award is presented to companies whose exports increase consistently year over year and account for a significant portion of revenue.
In 2007, Gerber Technology received the President’s “E” Award, the nation’s highest award to honor American exporters in a ceremony in Washington D.C., attended by President George W. Bush and Secretary of Commerce Carlos M. Gutierrez.
Gerber Scientific, Inc. is divided into four businesses:
- Gerber Technology (GT) is the largest business of GSI (accounting for 2/3 of revenues). It has been a world leader in providing sophisticated hardware and software systems to automate and more effectively manage the product design and manufacturing process with CAD software for pattern design, automated material spreading systems and computer-controlled cutting systems. The company serves 25,000 customers, including more than 100 Fortune 500 companies, in the aerospace, apparel, retail, composites, packaging, furniture, technical textiles and transportation interiors industries in 130 countries. Gerber Innovations, a business of Gerber Technology, is North America’s only full-line manufacturer of automated cutting hardware for the design, die making and short-run production segments of the packaging industry.
- Virtek Vision International, an Ontario, Canada-based business acquired by Gerber in Sept. 2008 for $33.1 million, serves aerospace carbon fiber composite part assembly, sheet metal part fabrication and construction markets with laser templating, quality inspection and spatial positioning systems.
- Gerber’s Yunique Solutions business, acquired by Gerber in Dec. 2009, and based in New York City, offers YuniquePLM product lifecycle management software. This web-based system helps retailers, brand owners and manufacturers manage all of the details associated with their products from conception to store shelf and helps them communicate with their suppliers around the world more effectively. Users of this software include Abercrombie & Fitch, Fruit of the Loom, Aeropostale, Merrell, and Cutter & Buck, among others.
- Gerber Scientific Products (GSP) develops and manufactures computerized sign making and specialty graphics systems, software, materials, and accessories to provide sign shops and graphics professionals with solutions for vinyl-cutting, digital color printing and dimensional signage needs. GSP also develops and supplies quality state-of-the-art aftermarket materials.
AccuMark Pattern Design Software:
- An intelligent pattern design software system for the apparel and fashion industry.
- For decades, hundreds of the world’s leading apparel manufacturers and fashion designers have relied on AccuMark® pattern design software to design and grade patterns and make the most efficient markers.
- For those just starting out with computer-aided design (CAD) for patterns, they can easily digitize their existing hard patterns into the AccuMark system using the GERBERdigitizer XLd manual digitizing system or AccuScan automated digitizing system.
- And, with Gerber’s AccuMark pattern design, grading and marker making software, you always have an electronic repository of your patterns and markers to minimize loss in the event of a disaster.
ADVANTAGES:
1- Accelerate pattern making tasks and save money.
With AccuMark software, pattern designers can automatically generate patterns from measurement specs either automatically or interactively. Not only does AccuMark software speed the pattern making process and save material, it also minimizes labor costs.
2- Grade patterns easily.
Simplify the grading process by referencing existing grade rule libraries. Accelerate the process by grading multiple pattern pieces simultaneously.
3- Improve collaboration with colleagues and suppliers.
AccuMark pattern design software enables you to communicate detailed instructions about your patterns and markers to your internal colleagues and your global suppliers – in their local language. With AccuMark, you can also supplement pattern details with photos, sketches and specific measurements.
4- Create the most efficient markers.
With AccuMark’s marker making functionality, users can create new markers or edit existing markers to respond to design changes or changes in material width. View material utilization as the marker progresses. With this powerful marker making software, you get all the information you need for downstream activities including how much fabric is required to make the marker, marker length, amount of material wasted and more. To simplify marker making even further, add Gerber’s AccuNest™ software which automatically makes markers 24 hours a day, analyzes multiple nesting options and selects the marker that is most efficient.
FUNCTIONALITY:
1- Initially selected the Gerber Launch Pad Icon, located on the Desktop of Personal Computer;
2- A new window appeared on the screen, on which the “AccuMark Explorer, Utilities” button was selected; 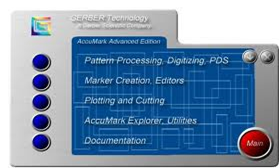 3- On selection of the button saying “AccuMark Explorer, Utilities” on the previous window, another window appeared on which the button saying “Accumark Explorer” was selected;
 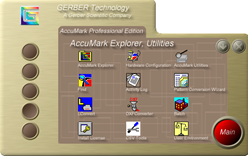 4- On selection of the button named “AccuMark Explorer” on the previos a window, a new window appeared on the Monito’s display;
 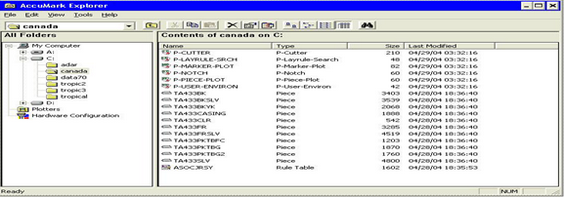 5- On this new window of “AccuMark Explorer” a vertical column on the Left Hand Side showed Drive C: as the space on the hard drive of the Computer where Storage Area was created;
6- Selected the Storage Area “10-187” previously created/generated;
7- Placed the Mouse Pointer in the empty area inside the “10-187”;
8- Pressed the “Right Click” of the Mouse that led to the opening of a Drop-Down Menu;
9- Selected “New” that led to the opening of a secondary Drop-Down Menu, in which selected “Rule Table”;
10- It led to the opening of a new window in which the following details were inserted/added:
a- Size Names:
Alphanumeric (for T-Shirt)
Numeric (Trouser/Pant)
b- Base Size:
M
(Stands for Medium size)
c- Smallest Size:
XS
(Stands for Extra Small)
d- Next Size Breaks:
11- Saved it by clicking on the Floppy Drive shaped icon in the Top-horizontal Tool-bar;
12- On saving the system asked to name the “Rule Table”, thus named it as “187”;
13- Closed this window of “Rule Table”;
14- On the main window of “AccuMark Explorer”, selected the button “View” in the top-horizontal Tool-bar;
15- It led to the opening of a Drop-Down Menu in which “Process Preferences” was selected;
16- On selection of “Process Preferences” a secondary Drop-Down Menu opened up in which selected the “Digitize Processing”;
17- On selection of “Digitize Processing” a new window appeared on the display;
18- In this new-window selected the original Storage Area created previously “10-187” and pressed button OK;
19- Than went to the Digitizing Table and took the Mouse with Crosshair in hand;
20- Took the Mouse with Crosshair to the bottom L.H.S of the Digitizing Table where specific input buttons were available on disposal;
21- Placed the Crosshair over the “START PIECE” and pressed button A (also known as Point) of the Mouse (it gave a beeping sound to confirm the execution of operation);
22- Moved the Crosshair on to the ALPHANUMERIC PORTION where;
27- Then took the bottom L.H.S corner of the Pattern as initiation point of digitization process, and did the following:
29- Finally ended the process by moving Crosshair to the “END INPUT” and then pressed button A. (DONOT PRESS DELIMITER)
30- Conclusively went to the PC, where LEFT-CLICK was pressed on the folder “Digitizer” outside “10-187”;
31- Selected the folder “BR01” and then RIGHT-CLICK was pressed which let a Drop-Down Menu to open up;
32- Then Selected “Verify”;
33- Afterwards went in to the “10-187” (Storage Area) and selected the “BR01” by double-clicking, that led to the opening of a new window, in which Dragged the small digitized pattern over the main interface and then saved the whole data.
34- Finally closed the AccuMark Software and Shutdown the Computer properly.
- Easily convert all file types
- Use existing pattern blocks to create new styles of garments
- Walk pattern pieces together on screen to ensure notches are positioned accurately and pieces will sew together properly
- Prepare production patterns with easy-to-apply seam finishes
- Quickly add annotation and images to pattern pieces to facilitate communication with colleagues and suppliers
- Use Pattern Wizard to automatically generate graded pattern blocks from a measurement chart. Place pattern pieces in a marker to quickly calculate material usage and costs
- Reference existing grade rule libraries to quickly grade patterns
- Grade multiple pattern pieces simultaneously
- Instantly create a sample marker containing valuable information for costing
- Ensure pattern accuracy across the graded marker
- Easily generate markers with required production quantities, material widths, fabrics, colors and sizes
- Enter fabric weight to calculate material costs more accurately, particularly with knit fabrics
- Compact existing markers to improve material utilization and fabric savings
- Automatically add splice marks to markers to assist during the spreading process
- Import fabric prints at actual scale, define repeats and use this information to match pattern pieces visually
- Eliminate double entry by generating marker and piece reports directly from AccuMark
- Transfer pattern and marker data to YuniquePLM or your ERP system.
- Personal Computer linked to Gerber Scientific’ s hardware (Digitizer & Plotter); and
- AccuMark software.
1- Initially selected the Gerber Launch Pad Icon, located on the Desktop of Personal Computer;
 |
| Gerber Launch Pad |


6- Selected the Storage Area “10-187” previously created/generated;
7- Placed the Mouse Pointer in the empty area inside the “10-187”;
8- Pressed the “Right Click” of the Mouse that led to the opening of a Drop-Down Menu;
9- Selected “New” that led to the opening of a secondary Drop-Down Menu, in which selected “Rule Table”;
10- It led to the opening of a new window in which the following details were inserted/added:
a- Size Names:
Alphanumeric (for T-Shirt)
Numeric (Trouser/Pant)
b- Base Size:
M
(Stands for Medium size)
c- Smallest Size:
XS
(Stands for Extra Small)
d- Next Size Breaks:
S
M
L
XL
M
L
XL
11- Saved it by clicking on the Floppy Drive shaped icon in the Top-horizontal Tool-bar;
12- On saving the system asked to name the “Rule Table”, thus named it as “187”;
13- Closed this window of “Rule Table”;
14- On the main window of “AccuMark Explorer”, selected the button “View” in the top-horizontal Tool-bar;
15- It led to the opening of a Drop-Down Menu in which “Process Preferences” was selected;
16- On selection of “Process Preferences” a secondary Drop-Down Menu opened up in which selected the “Digitize Processing”;
17- On selection of “Digitize Processing” a new window appeared on the display;
18- In this new-window selected the original Storage Area created previously “10-187” and pressed button OK;
19- Than went to the Digitizing Table and took the Mouse with Crosshair in hand;
20- Took the Mouse with Crosshair to the bottom L.H.S of the Digitizing Table where specific input buttons were available on disposal;
21- Placed the Crosshair over the “START PIECE” and pressed button A (also known as Point) of the Mouse (it gave a beeping sound to confirm the execution of operation);
22- Moved the Crosshair on to the ALPHANUMERIC PORTION where;
- Placed the Crosshair over letter “B” and pressed button A of the Mouse;
- Placed the Crosshair over letter “R” and pressed button A of the Mouse;
- Placed the Crosshair over digit “0” and pressed button A of the Mouse;
- Placed the Crosshair over digit “1” and pressed button A of the Mouse;
- Finally while keeping the Crosshair over the digit “1” pressed Delimiter of the Mouse.
- Placed the Crosshair over letter “F” and pressed button A of the Mouse;
- Placed the Crosshair over letter “R” and pressed button A of the Mouse;
- Finally while keeping the Crosshair over the letter “R” pressed Delimiter of the Mouse.
- Placed the Crosshair over letter “T” and pressed button A of the Mouse;
- Placed the Crosshair over symbol “-” and pressed button A of the Mouse;
- Placed the Crosshair over letter “S” and pressed button A of the Mouse;
- Placed the Crosshair over letter “H” and pressed button A of the Mouse;
- Placed the Crosshair over letter “I” and pressed button A of the Mouse;
- Placed the Crosshair over letter “R” and pressed button A of the Mouse;
- Placed the Crosshair over letter “T” and pressed button A of the Mouse;
- Finally while keeping the Crosshair over the letter “T” pressed Delimiter of the Mouse.
- Placed the Crosshair over digit “1” and pressed button A of the Mouse;
- Placed the Crosshair over digit “8” and pressed button A of the Mouse;
- Placed the Crosshair over digit “7” and pressed button A of the Mouse;
- Finally while keeping the Crosshair over the digit “7” pressed Delimiter of the Mouse.
27- Then took the bottom L.H.S corner of the Pattern as initiation point of digitization process, and did the following:
- For every point or edge of the Pattern, placed the Crosshair over each edge;
- And at each point pressed buttons A, then B and then LIFT;
- While on a curve like arm-hole, the corners or edges of the curve were digitized by placing Crosshair over the edge and pressing A, then B and then LIFT
- But within these two edges of the curve, the curvature was digitized by placing Crosshairs at various points and simultaneously pressing button A of the Mouse;
- It is very important to keep in mind that a clockwise flow was ensured while digitizing each edge and point, starting from the bottom L.H.S and ending at the bottom R.H.S of the pattern;
- Another vital aspect was to end the pattern’s digitization at the bottom R.H.S point by placing Crosshair over that point (which was the final corner of the curve or the neck-depth) and pressed buttons A, then B and then LIFT (DONOT PRESS DELIMITER HERE, otherwise error will appear in final results).
29- Finally ended the process by moving Crosshair to the “END INPUT” and then pressed button A. (DONOT PRESS DELIMITER)
30- Conclusively went to the PC, where LEFT-CLICK was pressed on the folder “Digitizer” outside “10-187”;
31- Selected the folder “BR01” and then RIGHT-CLICK was pressed which let a Drop-Down Menu to open up;
32- Then Selected “Verify”;
33- Afterwards went in to the “10-187” (Storage Area) and selected the “BR01” by double-clicking, that led to the opening of a new window, in which Dragged the small digitized pattern over the main interface and then saved the whole data.
34- Finally closed the AccuMark Software and Shutdown the Computer properly.